Where were we? Ah yes, sleeves and a NYE deadline. All knitting was finished by 12/31, but it was in all the wrong places. The sleeves proved to be too long and the body was really too short and rode up in the back. I basted in the sleeves (thank the knitting gods I didn't seam them) to try it on and once I realized how it (didn't) fit, collapsed on the couch, depressed and with the sweater in a pile. Surprisingly, it did not lead to excessive drinking that night.
The sleeve length was fairly easy to correct. I put the sweater back on determined I needed to take out 2 1/2 inches. Since I had only basted the sleeves (again thank the knitting gods for not having to pick out a seam) I simply pulled them out, undid the bind off and unraveled the length I needed. This was actually a good thing, because I could use the extra yarn to add length to the body. The tough part would be figuring out how to add short rows.
If you've ever run into this problem yourself or had a question about short row placement in a sweater, I strongly encourage you to read this post by Meg Swansen on Ravelry. I'll wait...... Cool, right? Meg is so awesome. So taking her advice, I definitely wanted to add short rows between the underarms and bottom of the sweater to correct the back riding up. However, I also needed to add length overall. Given the cable design in this sweater, inserting rows was going to have to happen in one large chunk instead of in multiple spots.
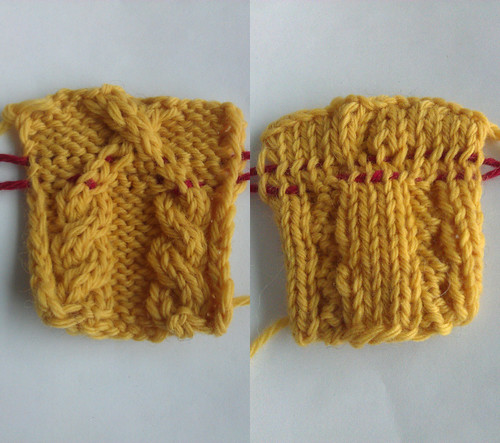
I initially thought of cutting off the ribbing and inserting one pattern repeat there, but multiple problems arose with that approach. One full cable repeat would have added 5 inches, more than I needed. Grafting cables that travel every other row is crazy-making; doing it in dark brown yarn is insanity. As you can see in the image below, I knit a swatch to help me understand grafting cables. The red yarn is a lifeline in two spots, one to catch the row below the one I would unravel, the other to catch the row above.

What's really critical here is catching the row above the one to be taken out (I've ripped plenty of knitting to be comfortable picking up loose stitches the normal way they unravel). To insert these lifelines, I ran the scrap yarn through the live stitches of the row in question right after it was knit. I wanted to use this swatch to see how I would have to run my needle through the sweater to grab the stitches in the right place.
Brief aside: Cables that travel every other row mean that you have to either a) catch a row above and below a row on which you twist stitches, so you're catching two 'straight' knit rows and removing the 'twist' row OR b) catch two 'twist' rows and remove a 'straight' row. Either way, it's incredibly tricky. Why not just cut out the row without a lifeline and pick the stitches up that way? Well, you're either going to be picking up a twisted row (hard to get the stitches in the right order, not to mention they're upside down) or you going to have to graft a 'twisted' cable row. Yikes.
As you can see in the image, the scrap yarn practically disappears into the knit fabric, and this is a light colored yarn with a high contrast lifeline. I found I was able to follow the red yarn relatively easily through the cabled swatch, but replicating the lifeline path in the dark brown sweater proved too daunting. That plan was out.
At this point I set the sweater aside for awhile and knit on a hat instead. I finished that in a day or two and, with a refreshed perspective, could return my thoughts to the problem at hand. I knew my options were down to something involving a lot of ripping and re-knitting. Going back to Meg's suggestions on short row location, I feared I would have to frog the whole body and basically start over to insert short rows 4 and 8 inches from the bottom. Instead I decided to just rip out the body above the armholes to add length and short rows there. I would be able to continue the cable pattern in the extra length I added and then simply re-knit the top portions of the front and back. As an added bonus with this plan, I could simply set aside the frogged yarn (with a label on each ball to be reassembled later) and add length using up most of all the remaining yarn.
Short row insertion is currently underway. I'm adding three inches in overall length and three sets of short rows to help fix the back of the sweater. Hopefully it all works out.
Thursday, January 12, 2012
Formulating a Plan
blog comments powered by Disqus


