First off, thanks for all the well wishes, I'm feeling MUCH better than a week ago. I still have a lingering cough, but I feel alive again. Now on with the knitting content.
Last week it was an exact copy of the Sorta River Rapids socks by LisaRadunz. Now I've gone and copied Micah's bitchin tiger-style yarn. I can't help myself!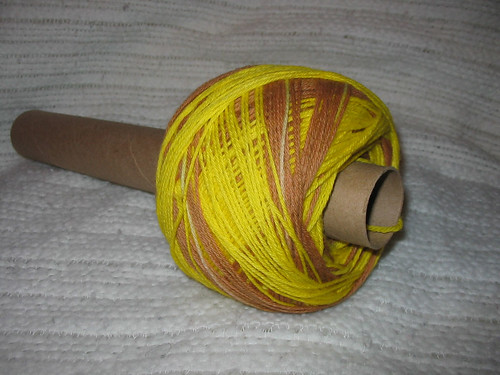
It should - hopefully - self-stripe into brown and yellow stripes and be totally awesome. I dyed this up late Friday night and Saturday morning, but of course, I didn't take any pictures until I was winding it up. That doesn't mean I can't tell you all about it though! Warning, this gets a bit rambly...
The set up
The base yarn is Knit Picks Bare - Merino Wool Fingering Weight a.k.a. the same yarn as the discontinued Memories line, which I love. It comes in one large 440 yd hank, and I thought I'd be able to wind it into two hanks directly, but it was NOT working out. I ended up winding a huge center pull ball, then setting that on the floor and winding around my kitchen chairs - alternating 5 times each - to set up the stripes. It was a pain in the ass until my hands got the hang of what to do to keep the yarn from popping off the chair backs. It probably took 30-45 minutes to wind the two hanks.
What I learned #1: tie the yarn off in lots of places. I only tied it in two places on either side (here's where photos would totally help) and it made it much more difficult to rewind the yarn after dyeing.
The dye process
Earlier in the day, I was lucky enough to find the perfect jars for dyeing striped yarn. They're Ball half-gallon wide-mouth jars, I got a pack of 6 for about $10 at ACO Hardware. Three of them will fit snugly into my dye-pot, so I could potentially do four different colors (three in jars, one in the pot), but that would be a bit of a risk.
I used Wilton's food dye, about 1/4 tsp each of yellow and brown. I filled the jars about half way with dye and water, then put the separated yarn inside and filled them to the top. I placed the jars in the pot and then filled it up too. I used our new probe thermometer to monitor the water temperature per the instructions found here.
What I learned #2: The jars need to be elevated off the bottom of the pot they're in or the water trapped underneath boils easily, and therefore moves the jars around when the hot water escapes.
What I learned #3: The water outside the jars gets much hotter than the water & yarn inside the jars. Put the probe thermometer inside the jars.
What I learned #4: The stretch of yarn between the two jars will wick water (and dye!) out of the jars and into the dye-pot if it droops down. This happens when the jars move about, see #2.
What I learned #5: Vinegar helps. When I pulled the yarn out of the jars the next morning after it cooled, there was still quite a bit of dye left in the jars. The yellow was all yellow (being a primary color) but the brown was more interesting. I believe brown is made up of red and green together and different colors move into the yarn at different rates. When I pulled the yarn out of the brown jar, it was brown, but more of a reddish-brown. And the water still left in the jar was kinda greenish-brown. According to pie-knits' instructions, you're supposed to add vinegar half way through the process to help with the uptake of the dye. But with my set up, there wasn't room in the jars for more liquid and even so, I couldn't have gotten the vinegar into the jars without pouring it directly onto the yarn. Once I pulled the yarn out and saw there was dye left, I had the opportunity to add the vinegar and re-heat the yarn. The water was crystal clear the next time. Amazing how that works.
I rolled the finished yarn in a towel and walked all over it to get as much water out as I could, then I hung it in the bathroom to dry. Once it was dry, I laid it out on the couch to wind up.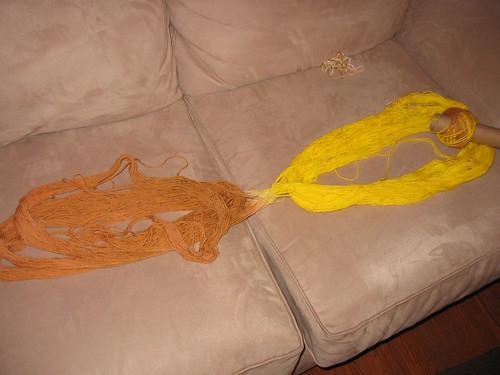
After a few tangles, I managed to get the yarn oriented correctly and had a much easier time winding it up. I really, really, really wanted to re-skein this instead of winding directly into a CPB, but I was afraid the tangles would drive me mad and the CPB would be easier to manage than a large chunk of cardboard. Ah well, there's always next time. Speaking of which, I have two more hanks of un-dyed yarn left, what shall I make next? I thought briefly of orange and green, but something tells me someone has already done that too...
Up next, a sweet over-dye and some socks updates.
Monday, January 14, 2008
I'm Such a Copy Cat
Subscribe to:
Post Comments (Atom)


7 comments:
Wow, awesome dye job. And thanks for the step by step tutorial too!
This would be very helpful http://www.joann.com/joann/search/search_results.jsp;jsessionid=MHJKYZ1WRMSF0P4SY5DVAFR50LD3OUPU?CATID=cat1110&keywords=swift&_requestid=2556160
AND they have a 50% off coupon.
Nice dye job! Can't wait to see what's next.
Thanks for the tutorial - what a great idea!
Wow! I guess you are feeling better. Can't wait to see these knitted up!
Thanks for the tutorial, I'm always looking for new stuff to try.
Is this your first dye job, boy are you brave. I forked over my yarn to someone else to be dyed because I was too much of a sissy to try it myself. In the end I was very happy with how it turned out and I didn't have to suffer through any headaches from the learning process.
Been teaching a yarn dyeing class myself...Using Wilton's cake icing..add teaspoon of alum(You can find this at any market on spice section) Many people use this for keeping alonger making pickle and jam...
After you mix the dye with water add teaspoon of alum, it will act as much brighter color and it will color of dyes stay longer when you wash the yarn.
Charles
Wow! I thought my process was difficult!
It looks great! I love those colors.
Post a Comment