 Mmmmm, looks pretty tasty to me! I finally finished the heel* on one of my Cat in the Hood socks last night, so I decided to reward myself with half an FO and sew up the top hem.
I wanted to use as much of this yarn as possible, however, when I held the sock up to my leg, it looked like it was going to hit my leg at the bottom of my calf. So, I chose a hem top instead of a straight up cast off to avoid any calf shaping. Plus, I personally think it's more stretchy than a traditional cast off. Finally, this allowed me to guarantee the sock would end with a brown stripe. I was concerned about the sock looking too yellow since it ended up so bright. I think it turned out nicely balanced.
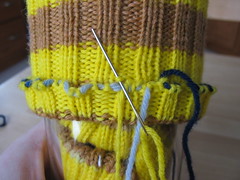
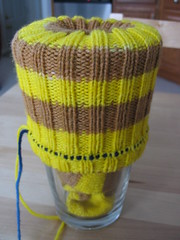
So what's with the pint glass? So glad you asked! I've sewn a hem top once before on one of my Carbonite Socks and it was kind of a bitch to do holding such a floppy material in my hands. Inspiration struck about a week ago when I realized that a pint glass was about the right diameter to hold the sock open enough to see the stitches as well as a hard surface to use the needle against. I stuffed the sock into the glass and then pulled it back over the top for about 5 inches. Then I flipped enough of the sock up - one 'stripe width' - so that none of the facing yellow stitches would show at the top of the sock and began sewing. I made sure to sew the live stitches to the last row of yellow stitches on the leg to avoid any color confrontation (yes, I just coined that phrase) on the outside of the sock. Also, it should be noted that I placed the stitches on a piece of scrap yarn rather than leaving them on DPNs so the sock would hug the glass smoothly.
 Then, following a wonderful tutorial** by TechKnitter, I slid the needle into the first live stitch purl-wise and tacked it to the corresponding stitch on the leg. Since I knit the socks in k2p2 rib, I ended up sewing purl stitches to knit stitches and vice-versa, no big deal. Click on the pictures to see more detail.
 After that I just worked my way around with the glass keeping the sock stretched well enough that I didn't sew any stitches too tightly. You can see that the resulting hem does not pull in as tightly as the rest of the sock, but rest assured that it stretches out just as well.
Finally, I leave you with an Ode on a Grecian Sock Urn. :-)
*I ended up using this tutorial to work an afterthought heel, which worked SO much better than simply working another 'toe' for a heel. I guess I have fat ankles. The first attempt resulted in a sock that was stretched so tightly, I was afraid my skin would start oozing through the stitches like play-doh.
**She doesn't explicitly explain sewing shut live stitches, but the concept is the same.


