Pattern: Very Warm Hat
Author: Elizabeth Zimmerman
Source: The Opinionated Knitter
Yarn: Knit Picks' Wool of the Andes in Natural, Cascade 220 in Red
Needles: Knit Picks Options, size 5
Started: January 16, 2009
Finished: January 31, 2009
Modifications: none
Ravel It!
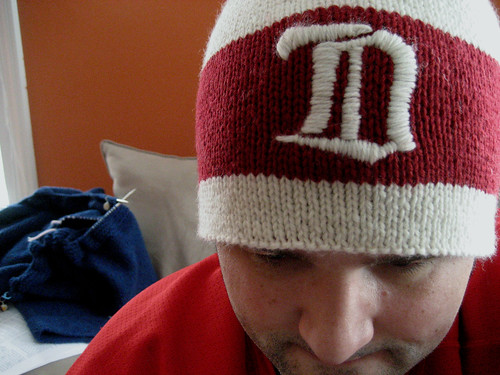
For the final goal of my January Hat Trick, I wanted to replicate the Red Wings version of the 2009 NHL Winter Classic hat. As soon as I saw the players skate out onto the ice wearing them, I knew I had to have one. I had one fortunate false start with this hat before I ripped it out. I say fortunate because after I frogged it, I rinsed/set the dye in the red yarn to avoid ending up with a pink hat. I'm glad I did because quite a bit of dye came out of the yarn. 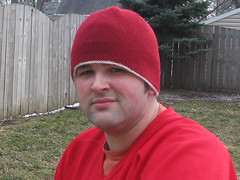 My first attempt had about a 4 inch lining in it to double up the material around my ears - I started the hat during the coldest point of winter thus far. I didn't like the way it sat on my head - you could see where the lining ended - so I decided to knit a fully lined hat. Of course, I turned to Elizabeth Zimmerman and her Very Warm Hat. I didn't want to use up any more of the natural yarn that absolutely necessary, so I knit the lining fully in red. The upshot is that the hat is completely reversible. I wasn't sure I would like the purled turn row (the original lining was just folded over) but it does form a nice edge between the two sides and I like how the white edging sets off the red side nicely on the reverse side.
It took several attempts to get the logo the way I wanted it and again, I'm so glad I stuck to my guns and did it right. I tried some practice, free-hand embroidery on the reverse side and was pleased with the result, but I knew I could do better. With the deadline for the knit-a-long fast approaching, I considered sewing on a felt patch. But after seeing how thin and flimsy the felt at JoAnn's was, I knew it wouldn't work. Not to mention the skinny parts of the logo would've been impossible to sew. The felt wasn't a complete waste though, as I used it for backing of the final logo. I believe the technique I employed is called satin stitch. It's basically filling in a shape or outline with lines of yarn sewn right next to each other. If you look at a store-bought, machine-knit cap, you can see a more refined version of this, and that's what I set out to duplicate. I'm cooking up another post that goes into further detail of the process.
The final verdict is absolute love, and quite possibly my best FO to date.
Saturday, February 21, 2009
FO: Red Wings Winter Classic Hat
Subscribe to:
Post Comments (Atom)


3 comments:
You know I love it!!
great job! i love the hat!
Now I feel like a creeper cause I commented on your post about how you made the "D", too, but I don't think you understand how many points making this hat would get me :)
Can you please tell me (1) where did you buy the "Very Warm Hat" pattern? (2) How do ou do the yarn rinse thing? Is there a method/technique, or did you just soak it in the sink and wait for it to dry before working?
This looks awesome - I can hardly believe you didn't buy it in a store!!
Thanks!! Kate :)
Post a Comment